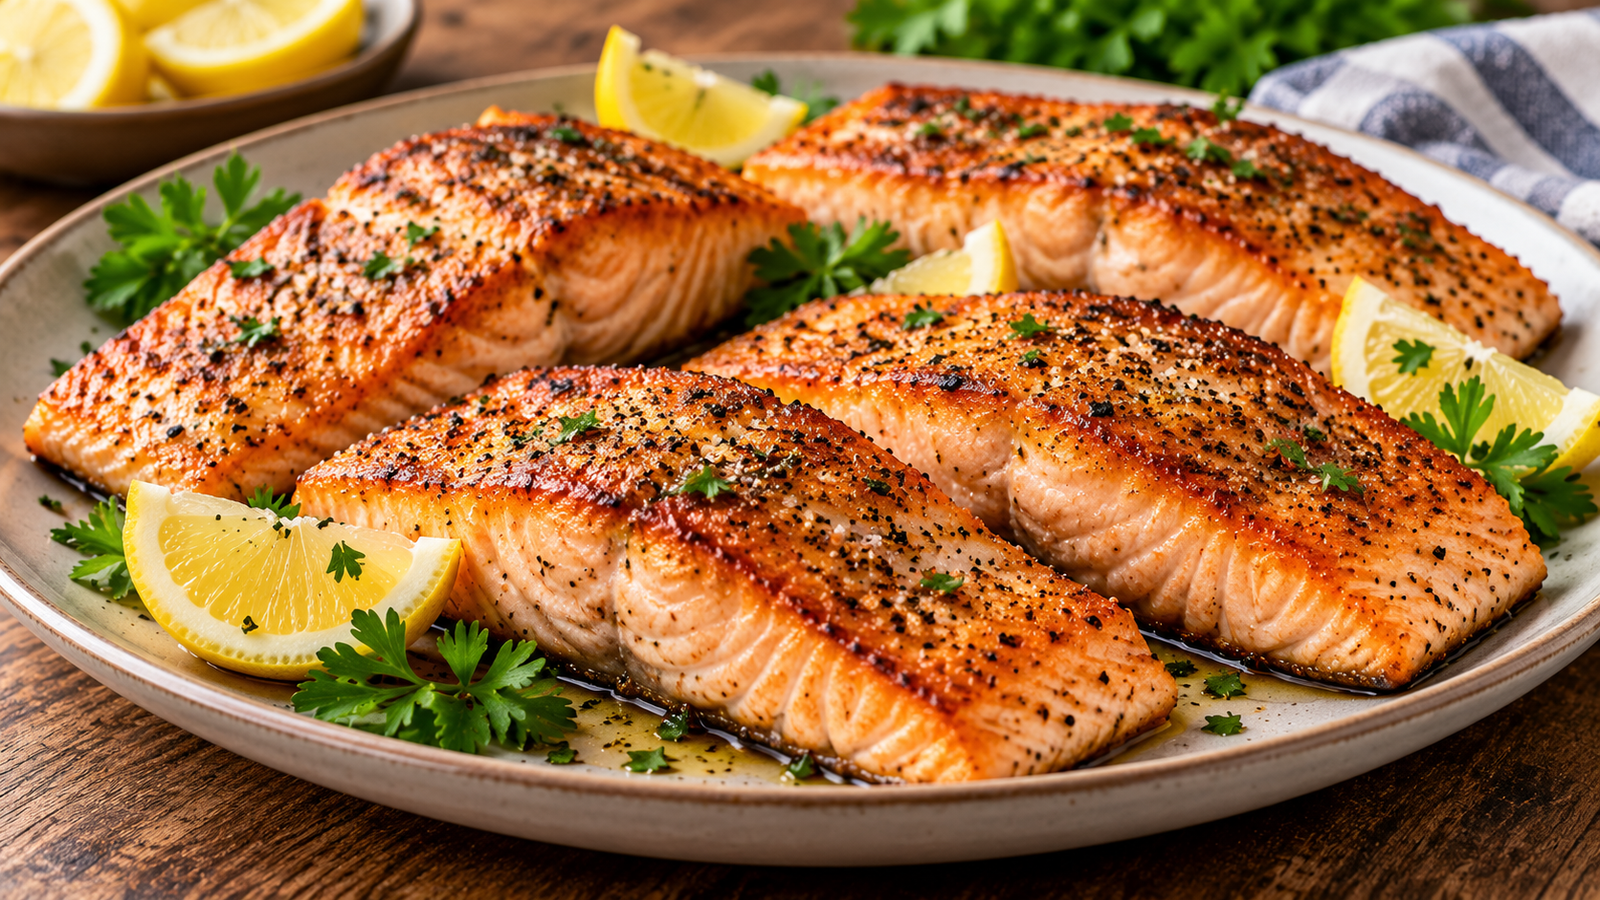
Golden on the outside and tender on the inside, this Pan-Seared Salmon is a simple yet elegant dish that brings restaurant-style flavour to your home kitchen. With just a few basic ingredients and a hot pan, you can create beautifully browned salmon fillets with a delicate, buttery texture.
A little olive oil, salt and freshly ground black pepper allow the natural flavour of the salmon to shine. Finish with fresh lemon juice, fragrant herbs or garlic butter for an extra layer of flavour that complements the fish without overpowering it.
This versatile recipe is perfect for quick weeknight dinners, special occasions and fresh, nourishing lunch bowls. Serve it with roasted vegetables, fluffy quinoa, steamed greens or your favourite potato dish for a satisfying meal.
Removing excess moisture helps the fish develop a golden crust.
Season both sides with salt and freshly ground black pepper.
Heat the pan.
Place a large frying pan or cast-iron skillet over medium-high heat.
Add the olive oil and allow it to heat until shimmering but not smoking.
Sear the salmon.
For skin-on fillets, place them skin-side down in the hot pan.
For skinless fillets, place the side you want to present facing down first.
Cook without moving the fish for approximately 4–5 minutes, depending on thickness.
The skin should become crisp, or the flesh should develop a golden crust.
Flip carefully.
Use a fish spatula to turn the fillets gently.
Reduce the heat to medium and cook for another 3–5 minutes, adjusting the time according to the thickness of the fish.
Add optional flavourings.
For garlic butter salmon, reduce the heat to low and add the butter and minced garlic during the final minute or two.
Spoon the melted butter over the fish, taking care not to burn the garlic.
Check for doneness.
The salmon should be opaque on the outside and separate easily into flakes.
For a food-safety-focused finish, cook fish to an internal temperature of 63°C, measured at the thickest part with a food thermometer.
Rest and serve.
Transfer the salmon to a plate and allow it to rest briefly.
Finish with lemon juice, fresh herbs or lemon zest, then serve immediately with your favourite sides.
Why You’ll Love This Seared Salmon Recipe
Quick and convenient: A delicious main course in about 15 minutes.
Simple ingredients: Salt, pepper and olive oil are all you need for the basic recipe.
Beautifully golden: A properly heated pan creates an appealing seared surface.
Tender and flavourful: Gentle finishing heat helps prevent the fish from drying out.
Easy to customise: Add garlic butter, fresh herbs, citrus or your favourite spice blend.
Versatile: Enjoy it with vegetables, salads, grains, potatoes or in wraps and bowls.
What Makes Pan-Seared Salmon Special?
Pan-searing uses direct contact with a hot cooking surface to brown the outside of the fish while the centre cooks. The result is a savoury, golden exterior and a tender interior.
Salmon contains naturally occurring fats that contribute to its rich flavour and moist texture. Keeping the seasoning simple allows those qualities to shine, while lemon, herbs and sauces provide freshness and contrast.
The key is to dry the surface thoroughly, heat the pan before adding the fish and avoid moving the fillets too soon. These small details help the salmon brown properly and release more easily from the pan.
Tips for the Best Pan-Seared Salmon
Dry the fillets thoroughly. Surface moisture creates steam and can prevent proper browning.
Preheat the pan. Add the salmon only when the oil is hot enough to shimmer.
Choose fillets of similar thickness. They will cook more evenly and finish at approximately the same time.
Start skin-side down. For skin-on salmon, this helps render the fat and create crisp skin.
Avoid overcrowding the pan. Cook in batches if necessary so the temperature does not drop too much.
Leave the salmon undisturbed initially. Moving it too soon can tear the surface and interfere with browning.
Use a fish spatula. A thin, flexible spatula makes turning delicate fillets easier.
Adjust the heat after flipping. Medium heat allows the centre to finish cooking without over-browning the outside.
Use a thermometer when possible. Salmon fillets vary in thickness, so temperature is more reliable than timing alone.
Add lemon at the end. Fresh citrus brightens the flavour without interfering with the searing process.
Let the fish rest briefly. A short rest allows the juices to settle before serving.
Storage and Reheating
Refrigerating: Allow leftover salmon to cool and refrigerate it in an airtight container within two hours of cooking. Use within 3 days.
Freezing: Cooked salmon can be frozen in a freezer-safe container for up to 2 months for best quality. The texture may be slightly softer after thawing.
Reheating: Warm gently in a covered pan over low heat with a small splash of water or stock. Alternatively, microwave in short intervals until heated through. Avoid excessive heat, which can dry out the fish.
Using leftovers cold: Flake refrigerated salmon into salads, wraps or grain bowls. Keep it chilled until serving.
Food safety: Discard salmon that has been left at room temperature for longer than two hours. Reheat leftovers until steaming hot throughout, and avoid repeatedly reheating the same portion.
What to Serve with Pan-Seared Salmon
Salmon pairs well with fresh vegetables, bright citrus flavours, creamy sauces and hearty sides. Choose a combination that balances its naturally rich taste.
Fresh and Bright Sides
Cucumber and dill salad: Cool, crisp and refreshing.
Shaved fennel and orange salad: Adds citrusy sweetness and a delicate crunch.
Green salad with lemon vinaigrette: Keeps the meal light and fresh.
Radish and herb slaw: Provides crunch, colour and a peppery note.
Beetroot and carrot salad: Adds earthy sweetness and vibrant colour.
Hearty and Comforting Sides
Roasted rosemary potatoes: Crisp edges and fragrant herbs complement the fish.
Creamy mashed potatoes: A comforting option for a traditional dinner.
Garlic mashed cauliflower: A smooth vegetable side with a mild flavour.
Wild rice pilaf: Adds a nutty texture and earthy depth.
Lemon orzo with spinach: A fresh, Mediterranean-inspired accompaniment.
Roasted carrots with citrus: Balance the richness of the fish with natural sweetness.
Wilted spinach: A quick, simple side that works well with garlic and lemon.
Grains and Bases
Quinoa Pilaf: A fluffy, aromatic base seasoned with cumin and turmeric.
Steamed rice: A neutral accompaniment that absorbs sauces.
Herbed couscous: A light, quick option with parsley and lemon.
Creamy risotto: Ideal for a more indulgent dinner.
Lemon and herb bulgur: Adds texture and a fresh, savoury flavour.
Sauces and Finishing Touches
Garlic butter
Creamy dill yoghurt sauce
Lemon and parsley butter
Honey-mustard glaze
Light citrus vinaigrette
Herb-infused olive oil
Here are some fun variations to experiment with for your Seared Salmon recipe:
Variations
🌿 Flavor Variations
Miso-Honey Glazed Salmon
Brush fillets with a mix of white miso, honey, and rice vinegar before searing
Garnish with scallions and sesame seeds for a Japanese-inspired twist
Mediterranean Herb Crust
Press chopped rosemary, thyme, and parsley into the seasoned fillets
Serve with lemon zest and a drizzle of olive tapenade
Smoky Paprika & Citrus
Season with smoked paprika and orange zest before cooking
Finish with a citrus glaze and fresh mint for contrast
Dijon Maple Glaze
Mix Dijon mustard, maple syrup, and a splash of apple cider vinegar
Brush on after flipping for a glossy, tangy finish
🍽️ Technique Twists
Skin-On Crispy Finish
Sear skin-side down first and press gently for even crisping
Serve skin-side up for texture and visual contrast
Sous Vide + Sear
Cook salmon sous vide for perfect doneness, then sear briefly for crust
Ideal for precision plating or entertaining
Cedar Plank Sear
Sear briefly, then finish on a cedar plank in the oven for smoky aroma
Pairs beautifully with herb butter and roasted vegetables
🎨 Styling & Pairing Ideas
Trio Plate Concept
Serve with quinoa pilaf and sautéed broccolini for a color-blocked trio
Plate in a radial or crescent layout with sauce drizzled in arcs
Vertical Stack Presentation
Layer salmon over a bed of greens or mashed sweet potato
Top with microgreens and edible flowers for height and elegance
Mini Tasting Portions
Slice fillets into small bites and serve on ceramic spoons or tasting boards
Pair with flavored salts, citrus pearls, or infused oils
Final Thoughts
Pan-Seared Salmon proves that a delicious meal does not need a long ingredient list or complicated preparation. A hot pan, a little olive oil and simple seasoning create a golden exterior while allowing the salmon’s naturally rich flavour to shine.
Serve it with quinoa pilaf, roasted vegetables, crisp salads or your favourite sauce, and adapt the seasonings to suit the occasion. Whether it is a quick family dinner or a carefully arranged dinner-party plate, this versatile recipe is one worth keeping close at hand.
Frequently Asked Questions
Should I cook salmon skin-side up or skin-side down first?
For skin-on salmon, start skin-side down. This gives the skin time to crisp and protects the delicate flesh as the fish cooks. For skinless fillets, start with the side you want to present facing down.
How do I stop salmon from sticking to the pan?
Pat the fillets dry, preheat the pan and use enough oil to coat the cooking surface. Let the salmon sear undisturbed until a crust forms. It should release more easily when it is ready to turn.
How long does salmon take to cook in a pan?
A typical 2–3 cm thick fillet takes approximately 8–10 minutes in total, although thickness, starting temperature and pan heat affect the timing. Check the thickest part with a food thermometer for the most reliable result.
Can I use frozen salmon?
Yes. Thaw frozen salmon in the refrigerator before cooking, then pat it thoroughly dry. Cooking from frozen is possible with suitable methods, but thawing first generally makes it easier to achieve an even sear.
Can I cook salmon without the skin?
Absolutely. Skinless salmon works well in this recipe. Handle it carefully when turning, as the flesh is more delicate without the skin.
What herbs go best with salmon?
Dill, parsley, chives, thyme and coriander all complement salmon. Dill and lemon provide a classic fresh flavour, while coriander and lime work particularly well with chilli-seasoned salmon.
How can I tell when salmon is cooked?
The flesh should be opaque and separate into flakes when gently pressed with a fork. For a straightforward food-safety benchmark, cook salmon to an internal temperature of 63°C at the thickest point.
Can I prepare salmon ahead of time?
For the best texture, season and cook the salmon shortly before serving. You can prepare the side dishes and sauces in advance, then sear the fish just before the meal. Leftover cooked salmon is also useful in cold salads and lunch bowls.
Essential cookies enable basic functions and are necessary for the proper function of the website.
Name
Description
Duration
Cookie Preferences
This cookie is used to store the user's cookie consent preferences.
30 days
These cookies are needed for adding comments on this website.
Name
Description
Duration
comment_author
Used to track the user across multiple sessions.
Session
comment_author_email
Used to track the user across multiple sessions.
Session
comment_author_url
Used to track the user across multiple sessions.
Session
Google's current Sign in with Google client library. It renders the Google sign-in button, or the One Tap prompt, so visitors can log in to your site with their Google account. It replaces the older Google Sign-In platform library.
Set on your own domain by the Sign in with Google client library. Records whether the visitor has dismissed the One Tap sign-in prompt and for how long it should stay hidden, plus the time the library last loaded and a browsing session id used for the same purpose. Sites that pass a custom state_cookie_name will see that name instead.
180 days
g_csrf_token
Set on your own domain by the Sign in with Google client library and submitted together with the sign-in credential, so your site can confirm the sign-in came from its own page and not from a forged cross-site request.
5 minutes
Statistics cookies collect information anonymously. This information helps us understand how visitors use our website.
Google Analytics is a powerful tool that tracks and analyzes website traffic for informed marketing decisions.
Contains information related to marketing campaigns of the user. These are shared with Google AdWords / Google Ads when the Google Ads and Google Analytics accounts are linked together.
90 days
__utma
ID used to identify users and sessions
2 years after last activity
__utmt
Used to monitor number of Google Analytics server requests
10 minutes
__utmb
Used to distinguish new sessions and visits. This cookie is set when the GA.js javascript library is loaded and there is no existing __utmb cookie. The cookie is updated every time data is sent to the Google Analytics server.
30 minutes after last activity
__utmc
Used only with old Urchin versions of Google Analytics and not with GA.js. Was used to distinguish between new sessions and visits at the end of a session.
End of session (browser)
__utmz
Contains information about the traffic source or campaign that directed user to the website. The cookie is set when the GA.js javascript is loaded and updated when data is sent to the Google Anaytics server
6 months after last activity
__utmv
Contains custom information set by the web developer via the _setCustomVar method in Google Analytics. This cookie is updated every time new data is sent to the Google Analytics server.
2 years after last activity
__utmx
Used to determine whether a user is included in an A / B or Multivariate test.
18 months
_ga
ID used to identify users
2 years
_gali
Used by Google Analytics to determine which links on a page are being clicked
30 seconds
_ga_
ID used to identify users
2 years
_gid
ID used to identify users for 24 hours after last activity
24 hours
_gat
Used to monitor number of Google Analytics server requests when using Google Tag Manager
1 minute
Marketing cookies are used to follow visitors to websites. The intention is to show ads that are relevant and engaging to the individual user.
Google Ads is an online advertising platform that enables businesses to create targeted ads displayed on Google search results and partner sites.
Targeting cookie. Used to create a user profile and display relevant and personalised Google Ads to the user.
2 years
__Secure-1PSIDCC
Targeting cookie. Used to create a user profile and display relevant and personalised Google Ads to the user.
2 years
__Secure-3PAPISID
Profiles the interests of website visitors to serve relevant and personalised ads through retargeting.
2 years
AEC
AEC cookies ensure that requests within a browsing session are made by the user, and not by other sites. These cookies prevent malicious sites from acting on behalf of a user without that user's knowledge.
6 months
ADS_VISITOR_ID
Cookie required to use the options and on-site web services
2 months
__Secure-3PSIDCC
Targeting cookie. Used to create a user profile and display relevant and personalised Google Ads to the user.
2 years
__Secure-3PSIDTS
Targeting cookie. Used to create a user profile and display relevant and personalised Google Ads to the user.
2 years
__Secure-1PSIDTS
Targeting cookie. Used to create a user profile and display relevant and personalised Google Ads to the user.
2 years
__Secure-1PAPISID
Targeting cookie. Used to create a user profile and display relevant and personalised Google Ads to the user.
2 years
__Secure-3PSID
Targeting cookie. Used to profile the interests of website visitors and display relevant and personalised Google ads.
2 years
Conversion
Google uses cookies for advertising, including serving and rendering ads, personalizing ads (depending on your ad settings at g.co/adsettings), limiting the number of times an ad is shown to a user, muting ads you have chosen to stop seeing, and measuring the effectiveness of ads.
90 days
_gcl_aw
Google uses cookies for advertising, including serving and rendering ads, personalizing ads (depending on your ad settings at g.co/adsettings), limiting the number of times an ad is shown to a user, muting ads you have chosen to stop seeing, and measuring the effectiveness of ads.
90 Days
_gcl_gs
Google uses cookies for advertising, including serving and rendering ads, personalizing ads (depending on your ad settings at g.co/adsettings), limiting the number of times an ad is shown to a user, muting ads you have chosen to stop seeing, and measuring the effectiveness of ads.
90 Days
_gcl_gb
Google uses cookies for advertising, including serving and rendering ads, personalizing ads (depending on your ad settings at g.co/adsettings), limiting the number of times an ad is shown to a user, muting ads you have chosen to stop seeing, and measuring the effectiveness of ads.
90 Days
_gac_gb_
Google uses cookies for advertising, including serving and rendering ads, personalizing ads (depending on your ad settings at g.co/adsettings), limiting the number of times an ad is shown to a user, muting ads you have chosen to stop seeing, and measuring the effectiveness of ads.
90 Days
FPGCLGB
Google uses cookies for advertising, including serving and rendering ads, personalizing ads (depending on your ad settings at g.co/adsettings), limiting the number of times an ad is shown to a user, muting ads you have chosen to stop seeing, and measuring the effectiveness of ads.
90 Days
FPGCLAW
Google uses cookies for advertising, including serving and rendering ads, personalizing ads (depending on your ad settings at g.co/adsettings), limiting the number of times an ad is shown to a user, muting ads you have chosen to stop seeing, and measuring the effectiveness of ads.
90 Days
You can find more information in our Cookie Policy and .